The closet industrial complex would like you to spend four thousand dollars on a custom California Closets buildout. You do not need to. With three hundred dollars and a Saturday afternoon, you can put together a closet that looks intentional, holds more than what you started with, and doesn't scream rental upgrade. The trick is mixing one structural piece with a handful of small upgrades that punch far above their price.
The honest quick answer
If you do nothing else: replace every plastic and wire hanger with matching velvet ones, and add a hanging shelf organizer to your existing rod. Those two moves cost about thirty dollars combined and make a worse closet look fifty percent more expensive overnight. Everything below is the upgrade path from there.
The base layer: matching velvet hangers
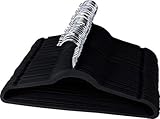
Mismatched hangers are the single biggest reason a closet reads as chaotic. Wire hangers from the dry cleaner, the chunky plastic ones from college, the wooden one from a hotel — all of it has to go. Velvet hangers are uniform, slim (you'll fit roughly thirty percent more on the same rod), and the flocking actually keeps clothes from sliding off. Fifty for eighteen dollars is the right starting quantity for one person; double up if you share the closet.
The structural piece: a real closet system
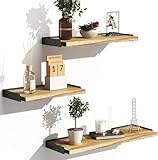
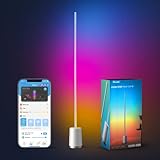
Here's where most people overspend. You do not need a full Pax build. What you need is one good modular tower or a sturdy hanging organizer that adds shelves and drawers to the dead space below your existing rod. ClosetMaid and Rubbermaid both make systems in the $80–$150 range that install in an afternoon with a drill and a level. If you want something that ships ready to hang with no hardware in the wall, a fabric hanging organizer works on rented closets and travels well when you move.
The hanging shelf organizer below is the rental-friendly version. It hooks over your existing rod, gives you six shelves of folded-storage real estate, and costs less than dinner out. For sweaters, jeans, and t-shirts you'd otherwise pile, this is the move.
The shoe situation
Shoes on the floor of a closet are the single most aging element in the entire room. A two-tier shoe rack costs twenty dollars and makes the floor of the closet look like a designed space instead of a pile. Allocate the bottom rack for daily-wear shoes and the top for less-frequent pairs. If you have more than ten pairs, get two racks side by side rather than one giant tower — the proportion reads better.
For boots and heels that don't fit on a rack, a clear over-the-door shoe organizer adds twelve to twenty-four pockets without taking floor space. The clear plastic version is the only one worth buying; the canvas ones sag and look bad within a year.
Drawer dividers: the upgrade nobody photographs
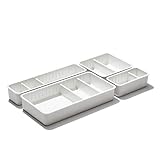
If your closet system has drawers, or if you're using a dresser inside the closet, drawer dividers are the silent upgrade that makes the whole thing function. The OXO Good Grips set is the right one — adjustable, non-slip, and they don't slide around when you open and close the drawer. Use them for socks, underwear, belts, scarves, and anything else that otherwise becomes a tangled handful when you reach in.
The seasonal storage problem
The reason your closet feels full is half the clothes in it are out of season. Vacuum storage bags compress puffer jackets, comforters, and sweaters down to roughly a quarter of their original volume. Pull them out twice a year, store the off-season pile under the bed or on the top shelf, and your active closet suddenly has thirty percent more usable space. Get the ten-pack — you'll use them all eventually.

The lighting nobody thinks about
If your closet has one bare bulb or, worse, no light fixture at all (looking at you, every apartment built before 2005), a battery-powered LED strip or motion-sensor puck light fixes it for under thirty dollars. This is the single cheapest upgrade that makes a closet feel like a real room instead of a storage hole. Adhesive-backed LED strips run along the underside of the top shelf; motion-sensor pucks stick to the wall and turn on when you open the door.
The actual cost breakdown
For a single reach-in closet, the realistic total comes out around $150–$200 if you're starting from nothing. Here's the math:
- Velvet hangers (50pk): ~$18
- Hanging shelf organizer: ~$20
- Two-tier shoe rack: ~$22
- Drawer organizers (one set): ~$30
- Vacuum storage bags (10pk): ~$28
- Motion sensor lighting: ~$25
Total: ~$143. You have $157 left in the $300 budget, which is exactly enough to add a second set of velvet hangers, a second shoe rack if needed, and a freestanding modular tower from ClosetMaid or Rubbermaid for the back wall if your closet is wide enough to use one. For a walk-in, double the velvet hangers and add one more shoe rack — you'll still come in under $250.
What to skip
Skip anything labeled luxury closet system that costs over $200 and ships in three boxes. Most of these are particleboard with veneer and will sag within eighteen months under the weight of actual clothes. Skip clear plastic shoe boxes — they look promising in photos and become a yellowed, dust-trapping mess in two years. Skip novelty hanger types (cascading hooks, multi-pant hangers); they tangle and you'll abandon them within a month. Skip bins without lids on the top shelf — open bins collect dust and look like junk drawers from the floor.
The order of operations
Do this in order, not all at once: First, take everything out of the closet. Second, donate or sell what you haven't worn in a year. Third, replace all hangers with the velvet ones. Fourth, install the shoe rack and drawer organizers. Fifth, install the lighting. Sixth, vacuum-bag the off-season pile. The whole project takes about three hours and you'll do better work if you don't try to install lighting before the closet is empty.
FAQs
Are velvet hangers actually better than wood?
For most clothes, yes. Wood hangers are heavier, take up more rod space, and only really shine for suits and structured jackets. Velvet hangers are slim enough to gain you about thirty percent more rod capacity, the flocking grips fabric so straps don't slide off, and the uniform look is what makes the closet read as designed. Use wood for a few suits if you have them; use velvet for everything else.
Will a hanging shelf organizer hold sweaters without stretching them?
Yes, as long as you fold rather than hang. Sweaters should never be hung — the shoulders stretch and you get the dreaded hanger bumps. Folding them onto a hanging shelf organizer keeps the shape intact and uses dead vertical space under your rod. One shelf per category (chunky knits, lightweight, cardigans) keeps them findable.
Do I need to drill into the wall for a real closet system?
For ClosetMaid and Rubbermaid systems, yes — they wall-mount with a top rail and standards. If you're renting and can't drill, stick with the hanging shelf organizer, freestanding shoe racks, and a portable garment rack for overflow. You can build a perfectly functional closet with zero holes in the wall, it just won't have the built-in look.
What's the right hanger color for a closet?
Pick one and use it for everything. Black reads modern and disappears against most clothes. Ivory or beige reads warmer and works well in older homes. Gray is the safe middle. The actual color matters less than the consistency — fifty matching hangers in any color look intentional, and a mix of fifty different colors looks like chaos.
Are vacuum storage bags reusable?
Yes, the good ones last three to five years of seasonal use. The double-zip versions hold up much better than the single-zip ones. The failure mode is usually a small puncture from a zipper or a sharp button on the clothes inside, so check items before bagging and store the bags somewhere they won't get stepped on.
What about cedar blocks for moths?
Cedar works but only when it's freshly sanded — the smell fades after about three months and so does the moth-repelling oil. If you actually have a moth problem, freezing infested items for a week kills both larvae and eggs, and lavender sachets work as well as cedar with a better smell. For prevention, store wool and cashmere clean (moths eat the residue, not the fiber) in vacuum bags during the off season.
Is it worth installing a closet light if I'm renting?
Absolutely. Battery-powered motion sensor pucks stick on with adhesive and pull off without damage when you move out. The visibility upgrade is enormous — most closets are dark enough that you can't actually see the back without bringing a phone flashlight, which is how you end up with the same three outfits in rotation while half your wardrobe sits forgotten.